
The screenshots in this guide use the light theme, which is the default. If your app is showing dark mode, click the sun icon at the top right to switch back to light.
An email campaign is a one-time message to a group of your patrons — ticket buyers, donors, a saved audience, or any combination of rules you define. You write it in the campaign composer, check how many people it will reach, and send it. Campaigns are for venue admins; box-office staff cannot open these pages.
Where to find it
Go to Admin → Venues → [your venue] and click Marketing in the Money group. On the Marketing page, click All campaigns — or New campaign at the top right to go straight to the composer.
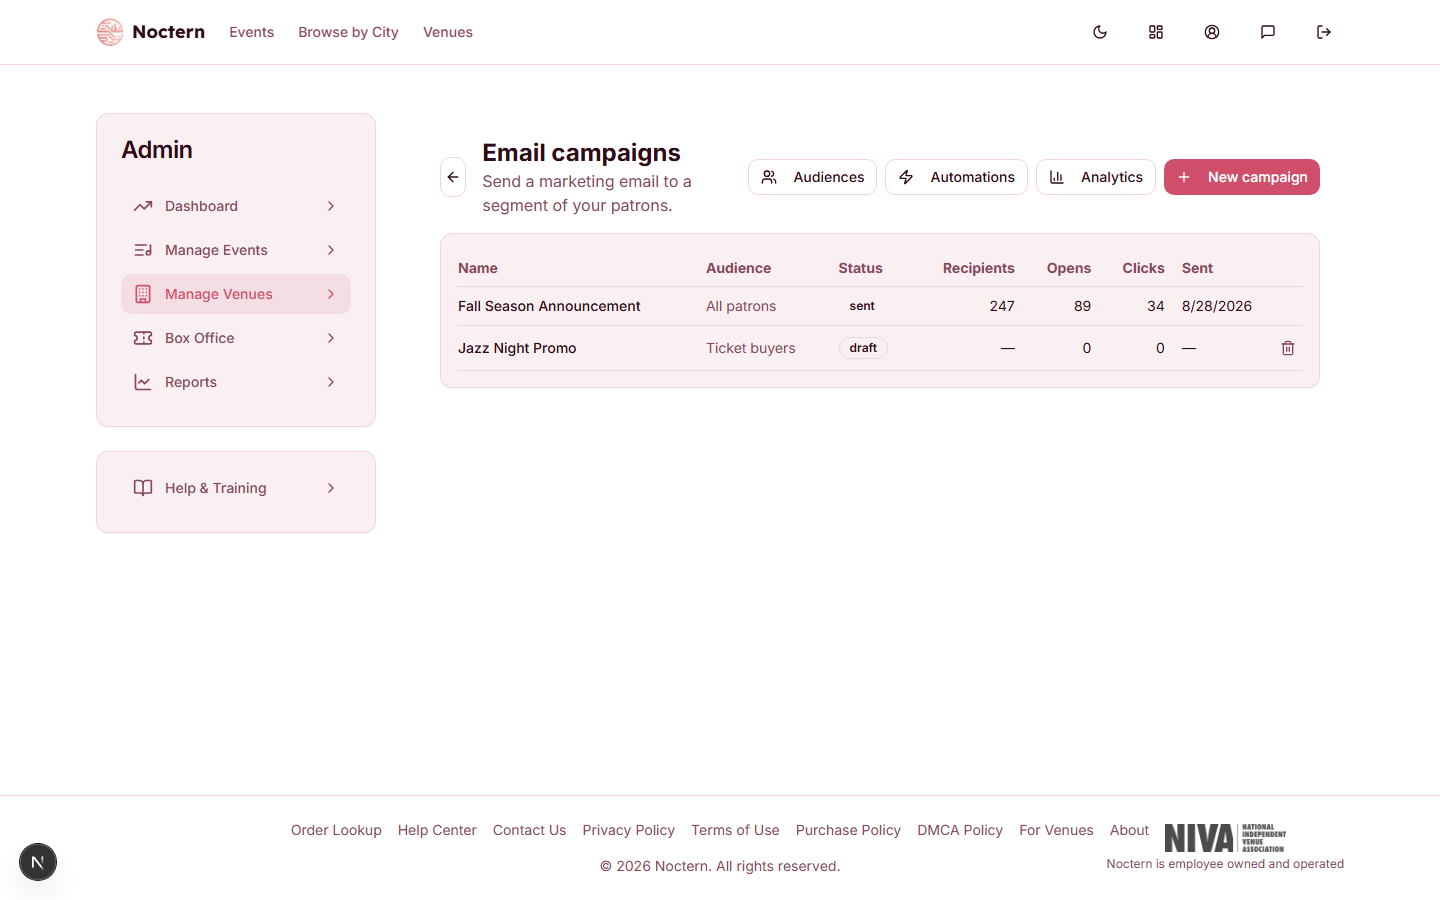
The campaigns list
Each row shows:
- Name — your internal label for the campaign. Click it to open the campaign.
- Audience — a short label for who was targeted (for example "All patrons", "Custom rules" or "Saved audience")
- Status — draft until you send it, then sent. A campaign shows sending while it is going out, and failed if no email could be sent at all.
- Recipients — how many patrons it was sent to. A draft shows a dash.
- Opens and Clicks — reported back by the email service, so they can lag a few minutes behind
- Sent — the date it went out
The buttons at the top open Audiences, Automations and Analytics. A draft has a trash icon at the end of its row; only drafts can be deleted.
Creating a campaign
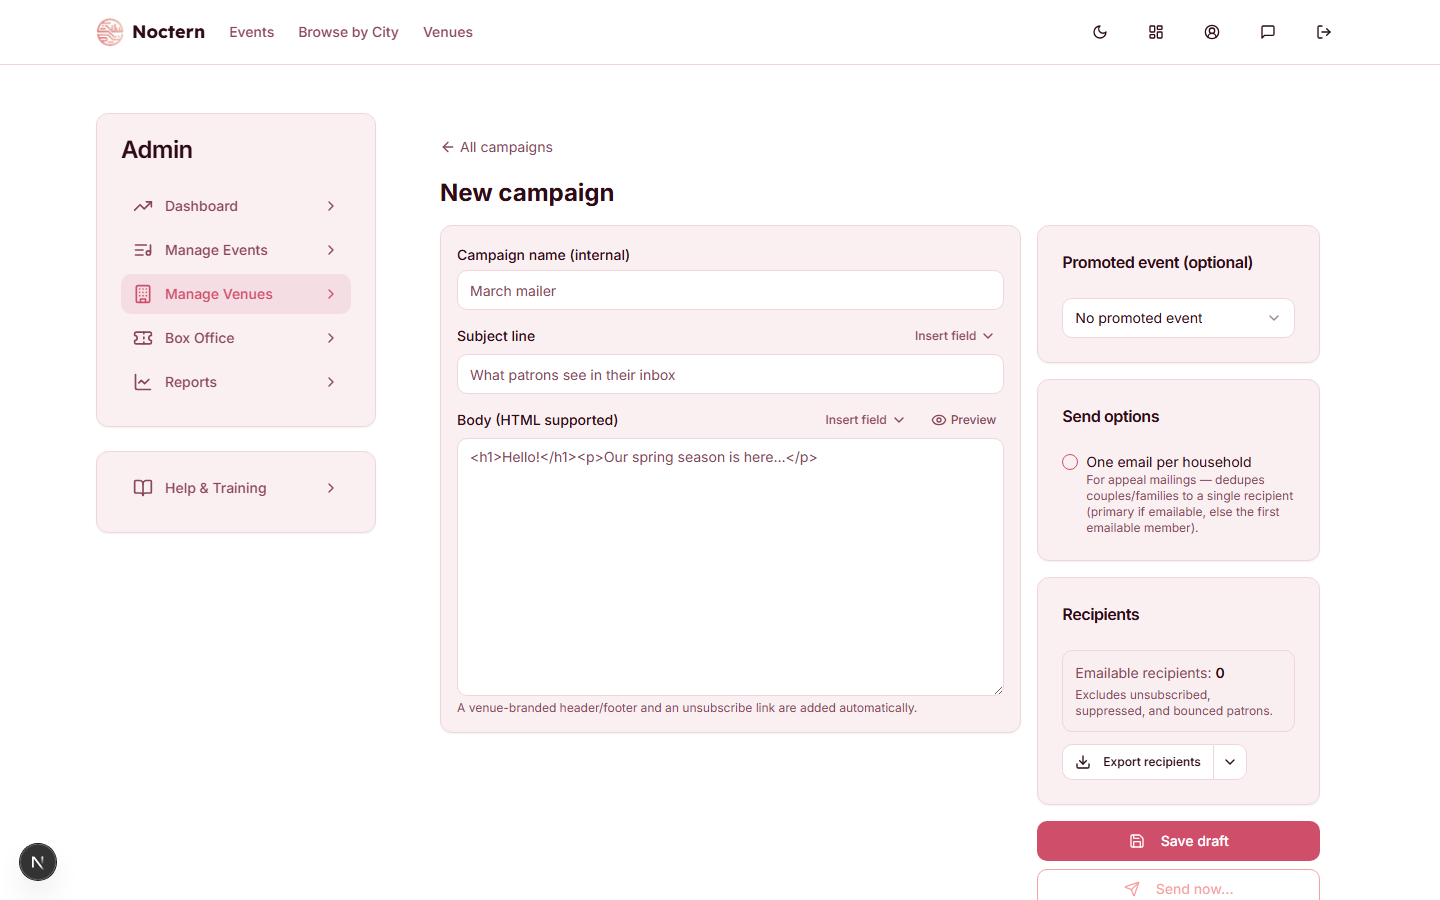
Click New campaign.
Enter a Campaign name (internal) and the Subject line. Both are required.
Write the email in Body (HTML supported). The body is HTML, so wrap paragraphs in
<p>tags and use<a href="...">for links. Your venue's name, address and an unsubscribe link are added at the bottom of every email automatically. Prefer not to write HTML? Type plain text and use Make it pretty.Click Insert field above the subject or the body to drop in a merge field such as the patron's first name. See Merge fields below.
Click Preview above the body to see the email with a sample patron (Jane Smith) filled in. Click Hide preview to go back to editing.
In the Audience card at the bottom, choose who gets the email: Simple for one preset group, Advanced to combine rules, or Saved audience to pick an audience you saved earlier.
Optionally pick a Promoted event. When you do, Exclude buyers of the promoted event appears, already ticked, so people who already hold a ticket to that show are left out.
Check Emailable recipients in the Recipients card. That is the number of people the email will actually reach.
Click Save draft to keep working on it later, or Send now… to send it.
Sending
Send now… opens a confirmation showing the campaign name, subject, audience and the number of recipients. Click Send now in that dialog to send. The email goes out immediately and cannot be recalled.
- There is no scheduling. A campaign goes out when you confirm it.
- The audience is worked out again at the moment you send, so the final number can differ slightly from the count you saw while editing.
- One send can reach at most 5,000 recipients. A larger audience is refused with a message telling you to narrow it; split it into two or more campaigns.
- Send now… stays greyed out while the recipient count is zero.
- Once a campaign is sent it is locked — you cannot edit the content or the audience.
Replies go to your venue's event email address (or the reply-to address you set with your own sending domain). To send from your own domain instead of Noctern's, see Sending email from your own domain.
Send options and exporting the list
- One email per household (in Send options) sends a single email to each household instead of one per person — the household's primary contact if they can be emailed, otherwise the first member who can. Patrons with no household are unaffected.
- Export recipients (in Recipients) downloads the current audience as CSV, or as Excel from the arrow beside it. The file lists everyone who matches, including people who cannot be emailed, with a
reachablecolumn and the reason inwhyUnreachable(no email, bounced, complained or opted out). An export stops at 20,000 rows.
Make it pretty
If you typed your email as plain text, it will arrive as one plain block — line breaks and all formatting are lost. Make it pretty turns your draft into a designed email for you: a headline, short paragraphs, your venue's colors, and a ticket button when the campaign has a promoted event or a ticket link.
Write your email in the body box, then click Make it pretty above it. It takes a few seconds.
Compare the two versions side by side: Current is your email as it would arrive today, Pretty is the restyled one. Both are shown with sample patron data.
Click Use this to replace your body with the restyled version, or Cancel to keep your email exactly as it was. If a new subject line is suggested, click Use this subject to take it — it is never applied on its own.
Changed your mind? Click Undo above the body to get your original text back. Undo stays available until you leave the page.
What it may and may not change:
- The wording can change. Sentences may be rewritten, reordered, and given headings so the email reads well. Read the preview before you accept it.
- The facts cannot. Every date, time, price, percentage, and promo code in your draft appears in the restyled version exactly as you typed it, and no new price or percentage is added.
- Merge fields are kept exactly, so personalization still works.
- Links are kept. Only links that were already in your email are used, plus the ticket page of the promoted event if you picked one.
If a restyled version would break any of these, you see "Couldn't make it pretty - try again." and your email is left untouched. Click the button again for another attempt.
Nothing is saved or sent by the button — you still click Save draft or Send now yourself. Only your draft, your venue's name, logo and colors, and the promoted event's details are used to restyle the email; no patron information is. Each venue can use Make it pretty 10 times per hour, and emails longer than 20,000 characters need to be shortened first.
Merge fields
Merge fields personalise the subject line and body. Pick one from Insert field, or type the token yourself.
| Token | What it inserts |
|---|---|
{{firstName}} | Patron's first name |
{{lastName}} | Patron's last name |
{{fullName}} | First and last name together |
{{informalSalutation}} | The patron's informal salutation (for example "Dear Jane") |
{{formalSalutation}} | The patron's formal salutation (for example "Dear Ms. Smith") |
{{email}} | Patron's email address |
{{venueName}} | Your venue name |
{{lastEventTitle}} | Title of the last event the patron bought tickets to |
{{lastEventDate}} | Date of that event |
Add a fallback after a pipe for patrons who have no value on file: {{firstName|Friend}} inserts "Friend" when there is no first name. Fallbacks can be nested: {{informalSalutation|{{firstName|Friend}}}}.
The composer warns you, under the body and again in the send confirmation, when:
- a token is not a recognized merge field — it would appear in the email exactly as typed
- a name field has no fallback
A merge field with no value and no fallback is left blank, which produces sentences like "Hi ," — always add a fallback to name fields.
Who is never emailed
Every campaign automatically leaves out patrons who have unsubscribed or are marked do-not-email, patrons whose address bounced or who reported an earlier email as spam, patrons who turned off promotional emails in their Noctern account, and patrons with no email address. You do not need to filter these out yourself.
After you send
Open a sent campaign from the list to see Recipients, Sent, Delivered, Opens, Clicks, Bounced and Attributed rev., with a copy of the email below. See Campaign analytics for what each number means.
Create a draft campaign with subject "Hello {{firstName|there}}" and body <p>Thanks for supporting {{venueName}}.</p>. Click Preview to confirm the merge fields fill in, click Save draft, then delete the draft from the campaigns list.